As I look for my students to expand their horizons in technology, I always try to find opportunities for kids to create and use content. We know kids become more engaged and motivated when their audience expands. William Glasser's work taught us that we learn 50% of what we see and hear and we can increase that learning to 95% when we actively use information and teach others.
In first grade we spend a lot of time talking about why we share our learning. I want my kids to acquire what Peter H. Johnston refers to as "agency" in his book, Choice Words. I want my kids to see themselves as active players in the global community and think of themselves as, "I'm the kind of kid who can ________." I'm the kind of kid who can save Africa. I'm the kind of kid who can develop a new app. I'm the kind of kid who can teach others even though I'm only six-years-old. When kids begin to view themselves as empowered, content-creators and information-sharers they see the relevance of their work and are inspired to do more.
With our iPad project I'm constantly asking my students why is this important and how could we share this learning with others? As a result of these types of questions, my students decided it was important that we share apps that help us learn and understand more. Using SonicPics, my students are creating video app reviews for kids in our classroom and beyond.
When asked why is this important, here is how a few kids responded:
"Because what if kids in kindergarten don't know about it and it could really help them learn."
"Well, if your parents want to buy apps this could tell them which ones are good ones."
"Maybe other schools are thinking should we get iPads? Yes or no? This could make them say, oh yes we should!"
So, check out Room 106's app reviews! We want to share our learning and hope that you learn something new from first grade!
Wednesday, November 23, 2011
Friday, November 18, 2011
The Power of a Camera

In 2006, our school participated in a state-wide laptop initiative. When the MacBooks with the iSight cameras arrived, at first we saw the camera as a convenience but not necessarily a transformative change. What we soon came to realize was that sometimes, increased convenience in a busy classroom of 30 children CAN be a transformative change! Having the camera always ready, always available, and seamlessly integrated with publishing and media tools makes it possible for students to document learning, create media, and capture their world at a moment's notice. Can you do this with a separate digital camera? Of course. But is it dramatically easier with a built-in camera? You bet it is. Anytime, anywhere access makes a difference with all technology, and a camera is no exception.
The addition of a camera with the iPad 2 is an even bigger deal. To use the MacBook's camera, the photography or video subject has to be positioned in front of the computer. With the iPad dual cameras, the subject can be literally anywhere. Students can capture anything in their learning environment and then podcast, write, draw, or blog about it.
The camera also makes a difference when it comes to assessment. Here's an example: first grade students in Kristin Ziemke's classroom were sorting books into fiction and non-fiction. Kristin needed to know who understood that difference. Kids snapped photos of their piles of books and e-mailed them to her. Voila -- not only does Kristin now know who accomplished this task, but she has simple, authentic data that she can keep and refer to later. In the past, she would have had to rush around to get to all of her students and assess their efforts, and the direct evidence of learning would have been lost the second the students cleaned up their tables.
Think of all the other learning moments students can capture with an iPad camera. Experiments, demonstrations, math manipulative configurations, models, posters -- anything that shows learning and understanding can be documented. When photos are brought into Pages, Keynote, iMovie, or SonicPics, they can become part of a richer reflection that includes text or audio. Those reflections provide authentic information about student understanding and can be captured throughout the year to show growth. The ease and accessibility of the built-in camera makes it possible to weave multimedia assessment throughout the learning day, and it also puts some of the power of documentation and assessment in the hands of the students themselves. Did you do something today you are proud of? Did you overcome a challenge you have had in your learning? Did you finish a book that was especially challenging? Take a picture. Write about it. Talk about it. Those moments are important in the life of a learner, and with a built-in camera, those moments can be saved and shared.
Monday, November 14, 2011
Using Google Forms in 1st Grade
We’ve got pets on the brain. For the past few weeks we have been reading about pets. We’ve written nonfiction text and poems about pets. We’ve collected data on pets, taken informal surveys of favorite pets and graphed our results. We interviewed our peers and asked students across to school to suggest the perfect pet for our classroom.
Now, it is time to select our classroom pet!
Here’s how technology guided this learning sequence over the past week.
First, students accessed the Google form on our classroom website.
")
Students had to select which pet they would like to have in Room 106 and provide a rationale for why. Using their iPads, students made their selections and submitted their vote.
")
At the end of the day we projected the results for the whole class to see and read the responses and rationales. My students were thrilled to see their submissions posted and motivated to read their peers’ posts. Many students tried to tally the votes in their head as we read the feedback, but I told them I’d compile the data and present the winning vote on Monday.
On Monday, using their iPads, my students acessed our classroom website. They navigated to the iPad page and viewed the results. To make this task accessible for all students, I paired photos, text and a pie chart to reveal the pet vote information.
")
And the winner is…a hermit crab! I wish I had videoed their excitement as the results were revealed.
Though this experience could have been done with markers and paper, technology enhanced this experience for my students as it provided a new mode and method for collecting data. Taking a survey on the iPad signified importance for my students; therefore, they worked hard to provide a detailed rationale that accurately communicated their thinking. Students increased the audience for their work as all children had the opportunity to read the posts as they were projected. This act connected the thinking and the collaboration taking place in our classroom and engaged my students actively as members of the learning community. In addition, my students were able to view data represented in multiple modes–this provided increased access for diverse learners and will hopefully build background knowledge for the next time students view data. Finally, this sequence built technology skills for accessing a website, completing an online survey and viewing data electronically.
How fun is that? There’s nothing better than students who are engaged, motivated and having fun learning!
Thank goodness the rat and the snake did not get many votes! I’m not sure what data I would’ve shared if that had happened…
Thursday, October 27, 2011
Extra practice with ten frames and number sentences
This week my students began using ten frames in math. Students used math counters and ten frame worksheets to add numbers 1-10. We did a few math practice pages throughout the week, but I noticed a few students still needed some additional practice opportunities.
Using the iPad and the Drawing Pad App, students created their own ten frames to demonstrate their understanding. Initially, students created their own number problems. They illustrated the ten frame and wrote a corresponding number sentence. At the end of the practice time, I asked all students to create a ten frame that represented the number “8″. Students then took a screen shot of their ten frame and sent the photo to me via email.

Today (from the comfort of my couch!), I was able to view their photos and use their ten frame drawings to assess who understood how to use a ten frame and write a corresponding number sentence. These photos provided a quick and authentic way for me to use student work to plan for next week’s instruction. Additionally, I now have documentation of each child’s learning that I can share easily with their families. What a treat to have opportunities for extended practice right at our fingertips! Another fun day of learning with the iPads!
Wednesday, October 12, 2011
iPad Organization

Today we launched the iPads in first grade. After several technical delays due to syncing issues, we launched a one-to-one, hands-on introduction this afternoon. My tech coordinator pushed-in to help with this lesson and it was wonderful to have two adults to provide support and also model appropriate iPad behaviors. My amazing tech coordinator taught students how to transport the iPad using a “table-top” carry, how to use a “butterfly touch” to interact with the screen and how to keep the device flat upon the table when working.
For our initial launch lesson we taught students how to use Whiteboard. Prior to the lesson a photo of each child (holding their calendar number) was synced to Photos. On the rug with the whole group my tech coordinator modeled how to open Whiteboard. She then showed students how to use the “Open” feature to locate their photo in the Photos folder. Next, she modeled how to use the Whiteboard tools to decorate the photo. Students were then called to the iPad cart to pick up their device and practice carrying it to their seat using the “table-top” carry. Students then replicated the lesson they had observed on the rug and used Whiteboard to decorate their photo. After decorating their photo, one of the teachers guided each child to save the image in Photos and then taught students to use the “Start Over” feature to clear their screen and begin a new project.
Once the image was saved to Photos the tech coordinator and I saved the image as the “Lock Screen” and “Home Screen.” Now each child’s device opens with an image of the child and their syncing number.
This initial lesson served as an introduction to Whiteboard and also provided an opportunity to personalize each device so they can be easily located, managed and synced. They lesson went very smoothly! I believe that Whiteboard is a terrific app to use for the initial lesson experience as it teaches kids how to touch and interact with the screen in a variety of ways. It is non-threatening and easy to use for all. Students can view their work immediately and gain confidence as they see themselves as competent iPad users.
Most importantly, my students were thrilled to use their iPads! They cradled their iPads like babies as they traveled to their table seats. A hush fell over the room as each child navigated their device. As I looked around, eyes were wide and mouths were open. Ahhh…they joys of engaged learning!
Wednesday, September 7, 2011
A look back at year 1.. and on to year 2!
Well, last year ended in a flurry of activity and mayhem, so it is just now at the start of year 2 that I find myself with the time and perspective to wrap up last year's experiences. A good deal of what we learned in year 1 will shape our approach to year 2 -- a year in which our iPad adventures will expand to encompass grades 1 through 5. But more on that later.
Here are a few of our take-aways from last year, in no particular order:
Mobile device access transforms how young students see themselves as technology users. Our pre/post survey data shows a significant increase in student confidence in a range of technology uses. About twice as many students now say they can use technology to find information and teach other people something they know. View a summary of our survey data here.
The iPad is a fantastic tool with which students can share their knowledge and ideas with others. Whether that means creating multimedia puppet shows, animated demonstrations, podcasts, documents, diagrams, or audio recordings, the iPad dramatically increases the number of options available for young learners to share what they discover and create. The iPad 2 (which we will have for the current year) obviously expands this potential much further. Not only can kids now create new kinds of work, but the iPad is the perfect venue for sharing that work back with the class. When our students created books that appeared on every classmate's iBooks shelf, it was a powerful experience. With most worthwhile student work, the sharing is as important as the content. Having that sense of audience gives kids pride in their work, motivation to teach others, and a sense of meaning and satisfaction in their learning.
It's okay -- even necessary -- for different teachers to use different approaches. Tailor professional development, content, and expectations to meet individual teachers' styles and strengths -- just like we do for the students!
Predictable scheduling of shared equipment increases usage. While flexibility is a nice idea, sometimes wondering whether the iPad cart will be available can make it too difficult for teachers to plan. Last year, we had a fixed rotation in the morning but a flexible sign-out in the afternoons. Result? The iPads were mostly used in the mornings. I think the sign-out method means technology gets used for stand-alone projects, rather then integrated into students' classroom lives. This year, our shared cart will follow a fixed regular schedule, with an option for teachers to swap when needed. This way, teachers know they have the cart 3 mornings and 2 afternoons a week, for example, and can plan integration accordingly.
Keep syncing simple. Have a dedicated user account on your computer for syncing. Anything that gets dropped in iTunes and iPhoto automatically syncs (be sure to check the "sync everything" boxes for photos, movies, etc). Anything you're finished with (content, photos, videos) can be left in tidy folders elsewhere so it will be ready next year. Also, figure out ways to transmit content without syncing. Syncing can be a buggy process at times, and it's good to have another way for kids to grab or submit files in case a before-school sync goes awry.
Routines are essential for young students. Okay, we already knew that, but starting with clear iPad routines and reinforcing them throughout the year is critical. Examples:
- Have a clear route for students to take when they take iPads from the cart. Designate a "waiting spot" or "on deck circle" to prevent crowding and collisions in front of the cart.
- Have kids push in their chairs before picking up iPads. This takes lots of practice and reinforcement, but it's the best way to keep two secure hands on those devices.
- Keep a basket of microfiber cleaning cloths on each table or on top of the cart, and have students manage smudges as they go. You can also have a Clean Screen Team that cleans all the iPads as a Friday job.
- Make sure there is a clear process for leaving the iPad ready for the next user. That includes exiting your own project (document, drawing, etc.) so it's not left over for the next kid, and returning the iPad to the home screen.
There are so many other take-aways about the incredible engagement we saw in our students, the power of using multimedia to reach every learner, the impact of increased access to information and learning resources, and more. These are the pieces of our year one experiences we will build on for this school year.
Our program is changing a bit for 2011-2012. We now have one-to-one iPads in grades 1 and 5. Our shared cart has moved up to grades 2 and 3, and there will also be a shared cart for grade 4. This blog will continue to address the literacy and inquiry work we are doing with our shared devices; we will also be adding a math component with a focus on computational fluency and math facts. We are starting a second blog to share our journey in the one-to-one classrooms and will share that link as soon as it's up and running. Without question, it's going to be another exciting year.
Tuesday, April 26, 2011
Ode to SonicPics
 Oh, SonicPics, our new favorite app. I have to give credit to my colleague Mike Amante in New Hartford, New York, who casually mentioned this app during a recent recording of Michelle Bourgeois and Katie Morrow's excellent podcast, Always On. We are always on the lookout for new apps to support student media creation, and SonicPics has yet to disappoint.
SonicPics is an app that allows students to select photos from the iPad Photo Library and then record narration to create a simple video. Kids simply swipe from one photo to the next as they talk and record their thinking. The final product can be e-mailed to the teacher as an m4v video file; if the file is too large, the teacher can transmit the video directly to the classroom computer over the network using an IP address provided by SonicPics.
SonicPics allows teachers to capture students' thinking visually and verbally, which is so powerful for young learners who may not yet be fluent readers and writers. The final products can be synced back to the iPad or shared with students via your iDisk or Dropbox. This gives students an audience and allows them to share ideas with their peers. Audio recordings also give students opportunities to self-reflec
t and self- assess, because they can listen to their recordings and re-record if they want to make improvements.
We have countless ideas for how to use this app and plan to try them all! Here are a few:
- Create multimedia books. Students create illustrations in a drawing app like Whiteboard Lite or Drawing Pad, save the illustrations to Photos, and then pull them up in SonicPics to record the words.
- Document a classroom experience. Load photos of a field trip, science experiment, special visitor, etc. onto the iPad and have students narrate the photos.
- Assess a learning experience. Load photos of an individual or group working in the classroom, and then have students narrate those photos to explain their process and reflect on their learning.
- Retell a story. Have students draw pictures to represent the beginning, middle, and end of a story, and then record their retelling.
- Generate questions to support inquiry. Load content-related photos on the iPad. Have students select 3-5 images and record their questions. This can also be an assessment piece to collect data about the level of thinking and questioning students are engaged in.
- Create a podcast. Use photos or student-created illustrations or diagrams as your images. Consider content-oriented podcasts, news about school, book reviews, issue-oriented podcasts -- the sky is the limit.
- Create a weather report. Take photos out the window and narrate them with data from any weather app or website. Share it on your class home page.
If there are any SonicPics users out there, we would love to hear how you are using this app to support student learning.


Thursday, April 7, 2011
Device Management Tips
Here are some basic, nuts-and-bolts tips that have helped our program run smoothly. Keep in mind that we have 34 iPads in one shared cart, and those devices are shared between 5 classrooms in grades 1 and 2.
Consider color-coded cases for your iPad. It is much easier for first graders to remember “go get the blue ones” than to remember “go get devices 13-18." We use the brightly-colored MiniSuit by Vizu, which is available from amazon.com.
Make the wallpaper image a jpeg of the device number. You can also reinforce the color-coding by matching the image color to the case color.
Have a landing pad for devices on top of the cart, and keep it clear of clutter. We put a colorful placemat on top of the cart. The mat is wide enough to accommodate 2 small stacks of iPads. Student tech teams need a safe place to put their stack of 2-3 devices down while they carefully slide them into the cart one at a time. They also need a place to set them while they are closing and locking the cart; trying to do so while holding iPads doesn’t work so well.
If your iPad devices are shared between classrooms, consider creating an electronic sign-out. We use a spreadsheet created at docs.google.com. We set the sharing permissions so that anyone could edit the spreadsheet, and then iPad teachers bookmarked the spreadsheet for easy access. (Only the iPad teachers can edit, because they're the only ones who have the link.)
Keep headphones in small crates or baskets on top of the cart, and keep a fixed number of headphones in each basket. Because each class uses 6 iPads at a time during literacy centers, we keep 6 in a basket. When kids come to grab the iPads, a "headphone helper" grabs a crate. We use the small and easy to store Califone 3060AV headphones. The cords are a bit too long, but we like the individual volume control.
Keep microfiber cleaning cloths in a basket on top of the cart. Have your student iPad team polish screens as they put the devices away. KlearScreen works great for extra smudgy screens, but if you have kids using this sprayable product, provide careful instruction so you don't end up with soggy iPads. If you have sticker shock on the KlearScreen website, a very slightly damp lint-free cloth is a thriftier option for ferocious fingerprints.
Appoint someone -- a staff member, parent volunteer, or older student -- to check the cart at the end of each day, ensure the devices are plugged in, and lock the cart. It's a lot of extra responsibility to ask the teacher who hosts the cart to take care of this -- especially when he or she is already putting up with the added foot traffic of student iPad teams.
Friday, March 25, 2011
Prehistoric Times Inquiry Research

This quarter we were studying Prehistoric Times in science. My first graders used the “Dinos” app to help guide their inquiry research. They read about many dinosaurs in the fact cards and used that information as a tool for their own inquiry projects. They used the research to present their own learning in different ways including; big books, dioramas and poster board presentations. They will be able to share all the research on our Explore More Day!
Friday, February 18, 2011
Assessing Student Learning

In the last few weeks I've been using the iPad as a tool for student reflection and assessment. To assess students' understanding of Native Americans, I posted 5 photos of different aspects of Native American life to the Burley iDisk. Students viewed all the images and then selected one they wanted to talk about.
Students copied one photo in iDisk and then opened a blank document in Pages. Students pasted their Native American photo and then shared what they knew about that aspect of Native American life.
Once students documented their understanding, they emailed the Pages document to me. I reviewed students' thinking, identified misconceptions and opportunities for reteaching and assessed overall understanding.
My students are becoming experts at using Pages. I've noticed that they have increased ability to create content for their peers and take their thinking public. This week each child published a piece of poetry using Pages and paired their text with an illustration using Whiteboard. I am excited to find additional opportunities for assessing student learning using the iPad!
Monday, February 7, 2011
Student publishing on the iPad
One of the best ways to motivate student writers is to give them an authentic audience for their work. The iPad provides an exciting way for students to publish work for one another. It was incredible to see kids' eyes light up when they saw the book they had created sitting on the iBooks shelf. They felt incredibly proud, and the iPad made it possible for each and every student to hold and examine a full-color publication of their classmates' work -- something that is difficult or impossible without the iPad. One of our goals is to use the iPad to allow students to begin to create resources for one another, which gives the students a sense of ownership over their own learning. Through this initial publishing process, we have figured out one way to start putting students in charge of their own content creation.
Here's how we did it:
- After reading about and studying particular topics, students in our second grade used the iPad to make documents in Pages. They imported drawings they had made in Drawing Pad or Whiteboard Lite, added captions and text, and used arrows and text boxes to create diagrams.
- We gathered the student Pages documents via e-mail. All the iPads use a single e-mail account, and the teachers are the only contacts. Students e-mailed us the documents as attachments. (You could also have them send in their work via DropBox or iDisk. If they sent their file directly to iDisk as a PDF, other kids could pull it up immediately and open it in iBooks -- instant publishing! The only reason we didn't do this is because we were assembling pages from multiple students' iPads into a single book.)
- We took all the related Pages documents and assembled them into a single Pages document using copy and paste. Students designed a front page to serve as the book cover. We then exported them as PDFs, dragged them to iTunes, and synced them to all the iPads. Our virtual bookshelf of student work is growing!
Wednesday, January 12, 2011
iTunes Volume Purchase Program for Apps
Before Apple clarified its iTunes store policies, it was common practice for educators to pay for an app one time and then load it on several devices. With the advent of the Volume Purchase Program and the new iTunes store Terms of Service, those days are past. If you haven't heard about the (relatively) new iTunes Volume Purchase Program, here's how it works -- at least for us.
First, you have to have an authorized purchaser set up a "master" account known as the Program Facilitator. The Program Facilitator purchases apps and receives the codes for downloading the apps (one code per device).
To get a Program Facilitator account, you have to have an authorized purchaser for your school or district contact your Apple education sales rep. There is limited information about this process on the Volume Purchase Program FAQ page. This is the only part of the process I am a little fuzzy on, as it was handled at the district level through our purchasing department.
Before you can buy an app, you need a Volume Voucher. This is essentially code you purchase and enter on the Volume Purchase Program site so you can buy apps. Vouchers can be purchased through your education sales representative. Once you have your Program Facilitator account and a Volume Voucher, you log in to volume.itunes.apple.com to redeem the voucher. This adds credit to your Program Facilitator account, which allows you to buy apps.
The Program Facilitator searches for and buys apps. After a short wait, a spreadsheet of Redeem Codes becomes available for download at volume.itunes.apple.com in the Program Facilitator account. Those codes can be distributed to users so they can download the app themselves; or, if you are syncing a set of iPads to a single computer, use one code to download the app and then maintain the rest of the codes for auditing purposes.
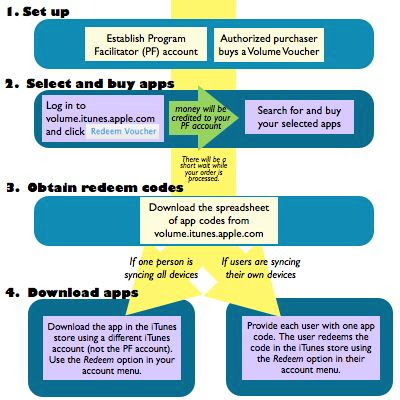
While this process may seem somewhat mysterious, it actually works pretty efficiently. It's nice to be able to receive codes that can be distributed to teachers or other uses who manage their own syncing, and although the price is considerably more than only buying the app once, at least most apps are discounted approximately 50%.
Monday, January 10, 2011
Accessing Web Content with Read It Later
I've been experimenting with Read It Later, a free app and website that allows you to save web pages for access on your iPad or other device. My colleague Begoña Cowan discovered this tool during a frenzy of app-hunting over the holiday break, and I think it has a lot of promise for organizing and sharing online resources for student access. Here's how it works.
The teacher logs in to a single shared account at readitlaterlist.com. There are a variety of third-party plug-ins and applications for managing Read It Later content, but so far I am content with the Read It Later bookmarklet. By dragging the bookmarklet to your Safari bookmarks bar, you enable your browser to save and tag web pages for future access.
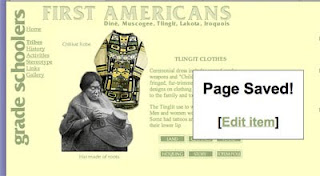
When you click the Read It Later bookmarklet, a box pops up
telling you the page has been saved. You can then tag or rename that page if you wish. I am tagging links with the room number of the students who will need the link, as well as the general topic. First graders are studying Native Americans right now, so I have tagged this page as 106 tlingit. Students in 106 who are studying the Tlingit tribe will be able to find this resource easily on the iPad.
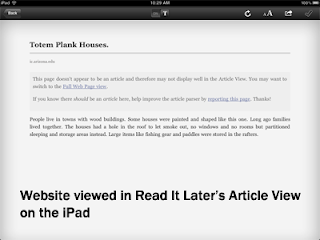
When viewing pages on the iPad in the Read It Later app, students can choose either the article view (text only) or the full web page view. The pages are downloaded to the iPad when the app is opened, so you can access the article later without an Internet connection.
Students can also add and tag sites as their research skills become more sophisticated, making Read It Later a handy shared repository of sites to support learning and research.
There are other apps, such as Instapaper and Evernote, that have similar functionality. I like the simplicity of Read It Later for our young students, but you may want to investigate other apps as well.
Subscribe to:
Posts (Atom)