Here are a few anchor charts my students and I developed during technology minilessons.
Follow along as a public elementary school in Chicago integrates the iPad into its first through fifth grade classrooms.
Thursday, January 24, 2013
This is How We Teach
Here are a few anchor charts my students and I developed during technology minilessons.
Wednesday, October 12, 2011
iPad Organization

Today we launched the iPads in first grade. After several technical delays due to syncing issues, we launched a one-to-one, hands-on introduction this afternoon. My tech coordinator pushed-in to help with this lesson and it was wonderful to have two adults to provide support and also model appropriate iPad behaviors. My amazing tech coordinator taught students how to transport the iPad using a “table-top” carry, how to use a “butterfly touch” to interact with the screen and how to keep the device flat upon the table when working.
For our initial launch lesson we taught students how to use Whiteboard. Prior to the lesson a photo of each child (holding their calendar number) was synced to Photos. On the rug with the whole group my tech coordinator modeled how to open Whiteboard. She then showed students how to use the “Open” feature to locate their photo in the Photos folder. Next, she modeled how to use the Whiteboard tools to decorate the photo. Students were then called to the iPad cart to pick up their device and practice carrying it to their seat using the “table-top” carry. Students then replicated the lesson they had observed on the rug and used Whiteboard to decorate their photo. After decorating their photo, one of the teachers guided each child to save the image in Photos and then taught students to use the “Start Over” feature to clear their screen and begin a new project.
Once the image was saved to Photos the tech coordinator and I saved the image as the “Lock Screen” and “Home Screen.” Now each child’s device opens with an image of the child and their syncing number.
This initial lesson served as an introduction to Whiteboard and also provided an opportunity to personalize each device so they can be easily located, managed and synced. They lesson went very smoothly! I believe that Whiteboard is a terrific app to use for the initial lesson experience as it teaches kids how to touch and interact with the screen in a variety of ways. It is non-threatening and easy to use for all. Students can view their work immediately and gain confidence as they see themselves as competent iPad users.
Most importantly, my students were thrilled to use their iPads! They cradled their iPads like babies as they traveled to their table seats. A hush fell over the room as each child navigated their device. As I looked around, eyes were wide and mouths were open. Ahhh…they joys of engaged learning!
Thursday, April 7, 2011
Device Management Tips
Here are some basic, nuts-and-bolts tips that have helped our program run smoothly. Keep in mind that we have 34 iPads in one shared cart, and those devices are shared between 5 classrooms in grades 1 and 2.
Consider color-coded cases for your iPad. It is much easier for first graders to remember “go get the blue ones” than to remember “go get devices 13-18." We use the brightly-colored MiniSuit by Vizu, which is available from amazon.com.
Make the wallpaper image a jpeg of the device number. You can also reinforce the color-coding by matching the image color to the case color.
Have a landing pad for devices on top of the cart, and keep it clear of clutter. We put a colorful placemat on top of the cart. The mat is wide enough to accommodate 2 small stacks of iPads. Student tech teams need a safe place to put their stack of 2-3 devices down while they carefully slide them into the cart one at a time. They also need a place to set them while they are closing and locking the cart; trying to do so while holding iPads doesn’t work so well.
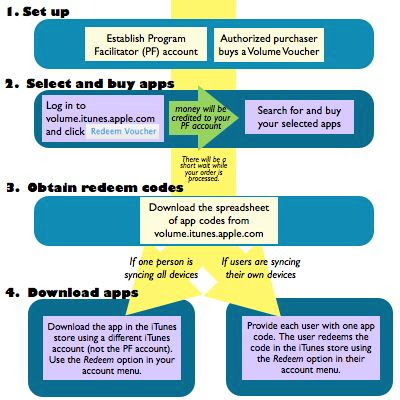
If your iPad devices are shared between classrooms, consider creating an electronic sign-out. We use a spreadsheet created at docs.google.com. We set the sharing permissions so that anyone could edit the spreadsheet, and then iPad teachers bookmarked the spreadsheet for easy access. (Only the iPad teachers can edit, because they're the only ones who have the link.)
Keep headphones in small crates or baskets on top of the cart, and keep a fixed number of headphones in each basket. Because each class uses 6 iPads at a time during literacy centers, we keep 6 in a basket. When kids come to grab the iPads, a "headphone helper" grabs a crate. We use the small and easy to store Califone 3060AV headphones. The cords are a bit too long, but we like the individual volume control.
Keep microfiber cleaning cloths in a basket on top of the cart. Have your student iPad team polish screens as they put the devices away. KlearScreen works great for extra smudgy screens, but if you have kids using this sprayable product, provide careful instruction so you don't end up with soggy iPads. If you have sticker shock on the KlearScreen website, a very slightly damp lint-free cloth is a thriftier option for ferocious fingerprints.
Appoint someone -- a staff member, parent volunteer, or older student -- to check the cart at the end of each day, ensure the devices are plugged in, and lock the cart. It's a lot of extra responsibility to ask the teacher who hosts the cart to take care of this -- especially when he or she is already putting up with the added foot traffic of student iPad teams.
Wednesday, January 12, 2011
iTunes Volume Purchase Program for Apps

Monday, November 8, 2010
In the loop


Thursday, September 30, 2010
Taking Ownership


